...and the Basics of Making Pasta and Storing Winter Squash
 |
| Red Kuri, Butternut, Acorn, and Spaghetti squashes |
Storage
If you grow your own winter squash harvest them before the first frost when the skin is so hard your thumb nail can't puncture it. Leave a couple of inches of stem on the squash because a soft scar invites bugs and early spoilage. If a squash happens to slip its stem, slate it for early usage. Choose unblemished squash for storage. If you buy in your squash look for these same qualities. Squash that's bruised, bug damaged, or has a damaged rind can be cooked and frozen as chunks or puree for later use.
Whether you grow your own or buy in the next step is to cure the squash. This applies to all squash except acorns which should stay green and be stored at 45-50F. If they start to turn orange it usually means they've been stored too warm. The change in color indicates a loss of quality. They are still fine to eat, they just won't be as flavorful or nutritious. Spread the squash in a sunny spot for 10-14 days. Cover them at night if a frost threatens or bring them inside if there's a threat of heavy frost. If it's rainy you can cure them indoors in a spot that's around 70-80F. If you have a woodstove park them near that. Stashing them around a water heater is another good spot. Once the squash are cured the ideal storage temperature is 55-60F but I've stored them both a little warmer and a little cooler with no problem. Root cellars are generally too damp and cold. I've successfully stored them individually wrapped in newspaper for a little protection in my garage next to the wall it shares with the house. I've stored them in the house in the coolest room. This time I'm going to store them in the unheated sunroom we built this past year. If your bedroom is the coolest room in the house, under the bed is a time-honored place to stash squash! Don't pile squash during storage. Lay them in a single layer with a tiny bit of space between them for air circulation. Properly cured and stored winter squash will last up to six months.
Butternut Squash Ravioli with Brown Butter Sauce
Squash-filled ravioli has been the darling of winter menus for the past few years and having made these I understand why. Making the ravs is not difficult but it is time consuming the first go-round so plan on spending an afternoon roasting squash, making pasta and shaping raviolis. I ended up both cooking more squash than I needed and making more ravs then it was good for us to eat at one sitting so I now have some pureed butternut in the freezer along with ravs for a future dinner!

This recipe uses Butternut squash but any of the winter squashes or pie pumpkins can be used. Except spaghetti squash. That's just texturally wrong.
Ingredients
Butternut Squash
Filling
2 medium (about 2 lbs each) butternut squashes, cut in half lengthwise and seeded
olive oil
For each 1 cup roasted
butternut squash puree:
3 tablespoons minced shallots
Salt
Freshly ground white pepper
3 tablespoons heavy cream
3 tablespoons grated Parmigiano-Reggiano cheese
Pinch Quatre Epices (see recipe below or substitute a pinch of nutmeg)
Pasta Dough
4 eggs
3½ cups all purpose flour
1 tsp salt
1 tablespoon olive oil
2 tablespoons water
Butter Sage Sauce
6 tablespoons butter
1/2 cup fresh sage leaves, thinly sliced
UPDATE: I had decided to make the ravs for the Master Food Volunteer potluck when I had a sudden imagined taste of the filling wrapped in buckwheat pasta. Nothing ventured, nothing gained, I subbed in 2 cups of buckwheat flour for 2 cups of all purpose flour. In addition to that I took a small handful of dried whole sage leaves, crumbled them finely and stirred them into the flour. I wasn't sure if I was going to have problems with the dough but it worked up nicely following the rest of the pasta dough recipe as is. The end result was amazing! From here out my go-to fall ravioli will be Buckwheat Ravs Stuffed with Butternut Squash!
UPDATE: I had decided to make the ravs for the Master Food Volunteer potluck when I had a sudden imagined taste of the filling wrapped in buckwheat pasta. Nothing ventured, nothing gained, I subbed in 2 cups of buckwheat flour for 2 cups of all purpose flour. In addition to that I took a small handful of dried whole sage leaves, crumbled them finely and stirred them into the flour. I wasn't sure if I was going to have problems with the dough but it worked up nicely following the rest of the pasta dough recipe as is. The end result was amazing! From here out my go-to fall ravioli will be Buckwheat Ravs Stuffed with Butternut Squash!
Directions
Preparing the Filling
Preheat the oven to 400 degrees. Generously oil a baking sheet with the olive oil and place the prepared squash on it cut side down. Bake for 40-45 minutes and poke with a knife. They should be very tender and poke easily. If they are
still hard give them some more time.

Pull the squash out of the oven and flip cut side up to cool. The color will have darkened a little and the edges caramelized. A little butter and a sprinkle of cinnamon and you have a great side dish. But don't do that 'cuz we're making raviolis here!

When cool, scoop out the flesh. Puree the flesh in a food processor, run it through a food mill, or puree it right in a bowl with an immersion blender. Whatever method you use, be thorough. You want a nice smooth puree. Two medium squash gave me 4 cups of roasted pureed flesh. I reserved 2 cups to use and froze the other two cups for future use.

In a large saute pan, over medium heat, melt
1 tablespoon of butter (more if needed depending on quantity of shallots). Add
the shallots and saute for 1 minute. Add the squash puree and cook until the
mixture is slightly dry, about 2 to 3 minutes. Season with salt and pepper.
Stir in the cream and continue to cook for 2 minutes. Remove from the heat and
stir in 3 tablespoons cheese and the pinch of Quatre Epices, to taste. Season with salt and pepper.
Cool completely.

Making the pasta
While the squashes are roasting make the pasta dough. Measure out the flour into a bowl and whisk the salt into it. Heap it onto your clean work surface and make a well in the center. Crack the eggs into the well and add the olive oil.

With a fork or a small whisk, gently beat the eggs and oil and then begin incorporating the flour from around the edges of the well.

When a soft dough has formed in the center of the flour pile begin working the rest of the flour in with your hands. It will be very sticky at first but as you work the rest of the flour in and continue kneading it will become smooth and elastic.

Depending on the humidity of your house and the day you may have to add a little water. If the dough is dry, grainy, and cracking add a little cold water, a half a teaspoon at a time, working in well after each addition until the dough feels supple but is not sticky in any way. Knead the dough a lot. This is key to developing the gluten fibers and it's surprising how pasta dough can quickly go from dry and nasty to beautiful when that balance of moisture and kneading has been reached. So easy on the water additions!

Shape the dough into a disk and then cut into quarters. Wrap each quarter in plastic wrap or place in a baggie and allow to rest for 30 minutes. Keep the dough covered so it doesn't dry out.

Remove one of the quarters from plastic and roughly shape into a rectangle.

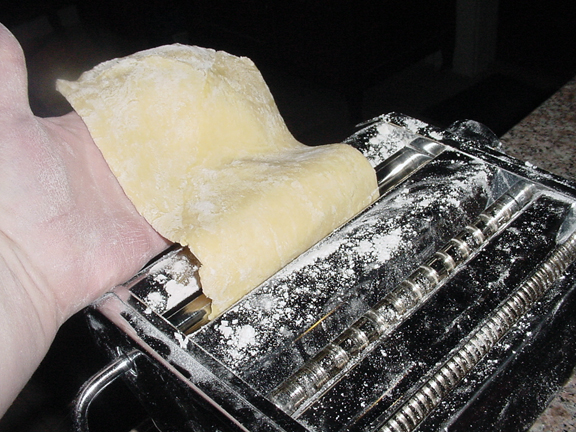
If you don't have a pasta roller, roll the rectangle out to roughly 5 inches by 2 feet long. The dough will be very thin. Cut the rectangle in half leaving you with two 1 foot long pieces. If you have a pasta roller set the rollers on the thickest setting and run the dough through it several times, folding the dough in thirds each time.


On one sheet, place a teaspoon of the
filling 1/2 inch from the edge and 1 inch from each other.

With a damp pastry brush, paint a little water down the center and between the mounds of filling but not the outer sides of the dough.

Cover with the other sheet. Carefully press the dough around the filling, removing any air pockets. I work from the center between the mounds out to the outer edge of the dough where I didn't dampen the pasta expelling the air there and then sealing the dough shut. I then cut out the pasta with a small round biscuit cutter but you can use the rim of a glass or small can, or cut the ravs into rectangles with a knife or pizza cutter.
 |
| oops! blow out! |
Transfer your raviolis to a floured or corn mealed surface and sprinkle the top of them with more flour or corn meal. Then cover them with a piece of plastic wrap or wax paper. I didn't flour mine and had a bit of a hassle peeling them free of the plastic wrap.

Repeat with the rest of the dough until you run out of dough or filling. I had a quarter of dough left so I rolled it out, cut it into tagliatelle, and froze it. From 2 cups of filling I got three dozen 2 1/2" wide ravs. I cooked up 20 for supper and froze the other 16. I laid as many as would fit in a layer side by side in a freezer container. These I covered with a piece of wax paper and then laid another layer on top of them and repeated until the container was full.
Making the sauce and cooking the pasta
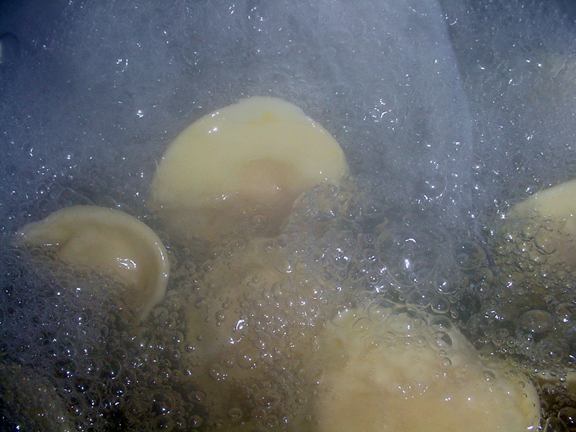
Bring a large pot of heavily salted water to a boil. Drop the ravs in, one at a time, and cook at a boil for 4 minutes. Pull one out and bite, checking for doneness. The dough should be firm but tender.
Meanwhile, melt the butter in a large skillet over medium heat. When melted, add the sage. Cook for a few minutes until sage is slightly
crispy. Be sure not to burn the
sage. Hold the sauce on the lowest heat until the raviolis are ready.

When the ravs are ready remove them from the pot with a slotted spoon and place directly into the pan with the butter sage sauce, turning gently to coat. If the pan appears to be getting dry add a little pasta water to it.

Plate the raviolis, pour the sage and butter sauce over top, and sprinkle with toasted pepitas (hulless pumpkin seeds) and grated parmigiana. If you can't get pepitas, toasted chopped walnuts would be a great substitute.

Quatre Epices
This translates as 4 spice powder. The recipe below has 6 spices. Go figure. Still tasty!
Ingredients:
1 tablespoon white peppercorns
1 small whole nutmeg or 2 tsp ground
10 cloves
1 cinnamon stick, about 2-inch or 1 tbsp ground
1 teaspoon ground ginger
1 tablespoon allspice berry
Directions:
Put all of the whole ingredients in a spice mill or blender and
process until evenly ground. Mix with the already ground ingredients. Store in a
cool, dark, dry place. Lasts for about 4
to 6 weeks without any loss of intensity of flavor and makes your typical spice jar sized quantity..
There are few better combos than sage and squash...yum!
ReplyDeleteI remade the ravs with buckwheat pasta after a brainflash. Even better than traditional pasta! See the update above.
ReplyDelete